Tuesday, January 3, 2012

2x4s are not 2 by 4...and other things I learned building a headboard.


This is what I've been up to.  Building a delicious headboard. (Idea from http://www.shelterness.com)

And I learned some things along the way. 
First and Most importantly: 2x4s are not 2'' by 4'' - if you have the guy at Lowe's cut your boards for you, and your plexiglass is already cut to fit your plans, this will be a crucial fact. 

A fact that I may have been the last human to learn. 

But real handywomen won't be deterred by such minor errors. :)

1. I built 57'' frame with cross boards out of 2x4s and secured it to the wall with anchors and L-brackets.


2. I put a layer of primer on the frame, and then lesson 2 made its point: If you buy boards that aren't really really straight, then you will have gaps when you try to fit things together.  The gaps were more pronounced with the primer on, so I filled them with a paint-able caulking.  Then she got a good layer of gloss white paint.


3. Each box got a strand of white LED lights, which I pinned to the wall and frame as needed so they wouldn't just be little tangled masses of lights at the bottom of each section. On the bottom left, where it would be hidden, but still easy to reach, I installed a push-button on/off switch.  


4. The plexiglass that I acquired (Thanks Brother! You are the best!) was the crystal clear variety.  I tried a few different products to make it frosty (opaqe-ize? to opaquen it?).  You can see in this picture how it started - the green bit down at the bottom.  I found a frost spray (designed to make glass look etched) was the best option.  All three sheets of plexi got 4 coats of spray and dried out overnight. It turned out even better than I expected!


5. I drilled guide holes for screws through the plexi and frame and attached with screws. (Third lesson learned: flat-head screws are a lot harder to tighten up with a drill than phillips head screws.  Just sayin'.) That's it!


It is perfectly awesome.  Bright enough to read with, but not garish. I kind of love it.  


Happy new year! 
My next growth experience will be some winterization stuff.  
What projects are you working on?


Sunday, January 1, 2012

It's a Brand New Year.

I set three goals for 2011.  And by halfway through the year, I could see that I was doing a mediocre job of focusing on them, and that without a change I wouldn't be reaching them.   I felt so scattered all the time - frantic and scared that I wasn't doing enough, always feeling like I just wasn't enough.

I have always believed in the power of words.  I think that if we keep words in front of us, if we say them out loud, if we testify of them, they are given power.  I started a list of words that defined who I want to be: Deliberate, Consistent, Simple, Peaceful, Loyal, Loving - and eventually I adopted the words "Peaceful Consistency."

I put them as the background on my work computer, my iphone, my life.  When I started to feel like I couldn't reach my goals I would just shut my mouth and trust in the peace that the savior gives to us.  I don't have to feel all of that anxiety and pain because he already did.  We can slow down, focus on consistently doing the right thing in THIS moment, and reach out for peace.

 I don't have to be perfect forever - I just have to be perfect in this moment.  And I can do that. I have got right now covered.


The 2011 goals were:

1. Lose some chunk - check!
I have taken off 50 pounds so far; and for the first time in my life I have done it the right way - It has been a lifestyle change.  I am regaining my health, and I will keep it for life.

2. Make scripture reading into a true daily habit - check!

3. Buy a home - check!

Left  -  Girls Camp
Right  -  12/31/2011, yesterday!
And best of all, I have a measure of peace and a witness that I am doing all I can to qualify for the things that I want most in life.

I haven't settled yet on what my goals will be for 2012, but there will be three: Health, Spiritual, and Financial.

 What are your goals for this new year? 

Tuesday, December 27, 2011

How the Gym Feels

I've been doing my best to become a gym rat over the past few months.  
Both of these gifs adequately represent my mercurial feelings about and successes/failures at the gym:


Thanks to http://simplybecauseitis.blogspot.com/ for the gifs.  

Saturday, December 24, 2011

NO MAIL RECEPTACLE

...that's what the packet of mail said that the postal worker left on my porch yesterday.  
Fortunately, my friendly new neighbor said I could put my new mailbox on her post! So, today, another project by a girl who keeps wishing she was a handy-person.


 Yeah!  No diggin' postholes in the winter for me! So off to the neighborhood Lowe's and
 then a date with my loves Black and Decker.


Anyway, its not too interesting, but I stole the neighbor's mailbox, thawed it out, got my new mailbox, drilled holes through the bottom of both and attached both mailboxes to 2X4 braces made of pressure treated wood. Finally, I installed L-brackets at the width of the post outside.


I walked that well-appointed and beautifully secured beast outside, attached it to the arm with 3 inch screws and the L-brackets and Tur-Dur! There you have it.  


Now I can get bills! :)


Thursday, December 22, 2011

Revamping the Ugly Bathroom Vanity

So you may or may not (probably not) remember that the new house had this in the bathroom:

The Scene of the Crime

Yes it is what you all envy - a REAL early 80's builder grade oak vanity!  With REAL low-grade paneling on the sides!  and with blood stains bright red nail polish all over the counter and sink!

I considered remodeling the bathroom to match the blood stains nail polish - but in the end decided that was just to kitschy to match the rest of the house.  

Because only the front of the vanity was solid wood, and the sides were paneled, re-staining would have required cutting wood panels to fit the sides and then trying to get the stain to match on all three sides.  So instead I decided to do this:

I sanded down the whole thing, drawers, nooks, crannies, doors - everything - until the sheen was removed and the paneling was roughted up a bit to hold onto the paint.  The whole thing was then wiped down with a wet rag to remove all the dust, followed by a wipe with a dry lint-free cloth to get it completely clean.  

Instead of removing the front of the drawers, I taped around the inside of the back - you can see it a little better in this photo:


Then I put on my gloves, grabbed a sponge to handle any drips, and went at it:


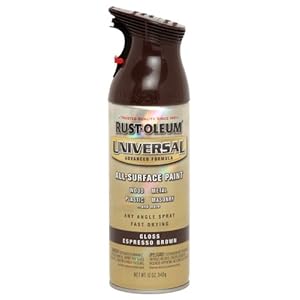
It took four light coats (just one can of paint) to get it completely covered and even. The color is Rustoleum's Espresso in Gloss, and I think that it pretty nicely mimics the mahogany that I kept seeing on those thousand dollar vanities over at Lowe's.  :)  So here is the finished product, installed (after using three bottles of acetone to remove all the nail polish):


Now I just need to get the mirror installed and one little corner of my home will be complete!  

Wednesday, December 14, 2011

Laney's New House!

Photos of my first house!  A lot of updates have already been finished, and I'll throw some updated pictures on here as soon as I get all my boxes unpacked.